We (Netragard) recently completed an engagement for a client with a rather restricted scope. The scope included a single IP address bound to a firewall that offered no services what so ever. It also excluded the use of social attack vectors based on social networks, telephone, or email and disallowed any physical access to the campus and surrounding areas. With all of these limitations in place, we were tasked with penetrating into the network from the perspective of a remote threat, and succeeded.
The first method of attack that people might think of when faced with a challenge like this is the use of the traditional autorun malware on a USB stick. Just mail a bunch of sticks to different people within the target company and wait for someone to plug it in; when they do its game over, they’re infected. That trick worked great back in the day but not so much any more. The first issue is that most people are well aware of the USB stick threat due to the many published articles about the subject. The second is that more and more companies are pushing out group policies that disable the autorun feature in Windows systems. Those two things don’t eliminate the USB stick threat, but they certainly have a significant impact on its level of success and we wanted something more reliable.
Enter PRION, the evil HID.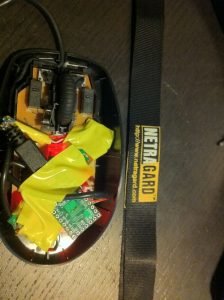
A prion is an infectious agent composed of a protein in a misfolded form. In our case the prion isn’t composed of proteins but instead is composed of electronics which include a teensy microcontroller, a micro USB hub (small one from RadioShack), a mini USB cable (we needed the ends) a micro flash drive (made from one of our Netragard USB Streamers), some home-grown malware (certainly not designed to be destructive), and a USB device like a mouse, missile turret, dancing stripper, chameleon, or whatever else someone might be tempted to plug in. When they do plug it in, they will be infected by our custom malware and we will use that point of infection to compromise the rest of the network.
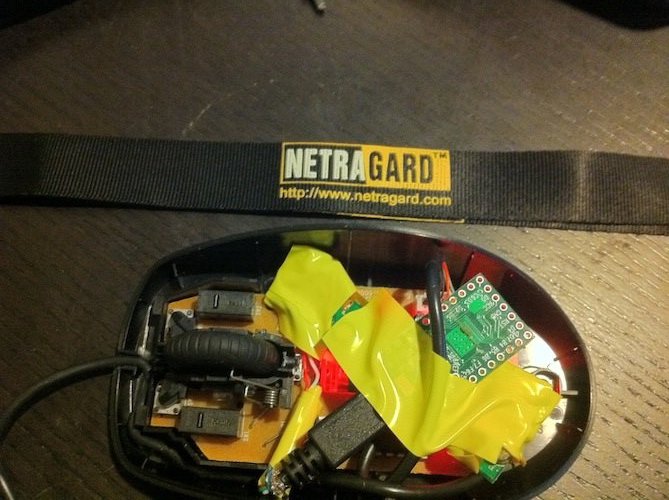
For the purposes of this engagement we choose to use a fancy USB logitech mouse as our Hacker Interface Device / Attack Platform. To turn our logitech Human Interface Device into a Hacker Interface Device, we had to make some modifications. The first step of course was to remove the screw from the bottom of the mouse and pop it open. Once we did that we disconnected the USB cable from the circuit board in the mouse and put that to the side. Then we proceed to use a drummel tool to shave away the extra plastic on the inside cover of the mouse. (There were all sorts of tabs that we could sacrifice). The removal of the plastic tabs was to make room for the new hardware.
Once the top of the mouse was gutted and all the unnecessary parts removed we began to focus on the USB hub. The first thing we had to do was to extract the board from the hub. Doing that is a lot harder than it sounds because the hub that we chose was glued together and we didn’t want to risk breaking the internals by being too rough. After about 15 minutes of prying with a small screwdriver (and repeated accidental hand stabbing) we were able to pull the board out from the plastic housing. We then proceeded to strip the female USB connectors off of the board by heating their respective pins to melt the solder (careful not to burn the board). Once those were extracted we were left with a naked USB hub circuit board that measured about half an inch long and was no wider than a small bic lighter.
With the mouse and the USB board prepared we began the process of soldering. The first thing that we did was to take the mini USB cable, cut one of the ends off leaving about 1 inch of wire near the connector. Then we stripped all plastic off of the connector and stripped a small amount of wire from the 4 internal wires. We soldered those four wires to the USB board making sure to follow the right pinout pattern. This is the cable that will plug into the teensy mini USB port when we insert the teensy microcontroller.
Once that was finished we took the USB cable that came with the mouse and cut the circuit board connector off of the end leaving 2 inches of wire attached. We stripped the tips of the 4 wires still attached to the connector and soldered those to the USB hub making sure to follow the right pinout patterns mentioned above. This is an important cable as its the one that connects the USB hub to the mouse. If this cable is not soldered properly and the connections fail, then the mouse will not work. We then took the other piece of the mouse cable (the longer part) and soldered that to the USB board. This is the cable that will connect the mouse to the USB port on the computer.
At this point we have three cables soldered to the USB hub. Just to recap those cables are the mouse connector cable, the cable that goes from the mouse to the computer, and the mini USB adapter cable for the teensy device. The next and most challenging part of this is to solder the USB flash drive to the USB hub. This is important because the USB flash drive is where we store our malware. If the drive isn’t soldered on properly then we won’t be able to store our malware on the drive and the the attack would be mostly moot. ( We say mostly because we could still instruct the mouse to fetch the malware from a website, but that’s not covert.)
To solder the flash drive to the USB hub we cut about 2 inches of cable from the mini USB connector that we stole the end from previously. We stripped the ends of the wires in the cable and carefully soldered the ends to the correct points on the flash drive. Once that was done we soldered the other ends of the cable to the USB hub. At that point we had everything soldered together and had to fit it all back into the mouse. Assembly was pretty easy because we were careful to use as little material as possible while still giving us the flexibility that we needed. We wrapped the boards and wires in single layers of electrical tape as to avoid any shorts. Once everything was we plugged in we tested the devices. The USB drive mounted, the teensy card was programmable, and the mouse worked.
Time to give prion the ability to infect…
We learned that the client was using Mcafee as their antivirus solution because one of their employees was complaining about it on Facebook. Remember, we weren’t allowed to use social networks for social engineering but we certainly were allowed to do reconnaissance against social networks. With Mcafee in our sights we set out to create custom malware for the client (as we do for any client and their respective antivirus solution when needed). We wanted our malware to be able to connect back to Metasploit because we love the functionality, we also wanted the capabilities provided by meterpreter, but we needed more than that. We needed our malware to be fully undetectable and to subvert the “Do you want to allow this connection” dialogue box entirely. You can’t do that with encoding…
To make this happen we created a meterpreter C array with the windows/meterpreter/reverse_tcp_dns payload. We then took that C array, chopped it up and injected it into our own wrapper of sorts. The wrapper used an undocumented (0-day) technique to completely subvert the dialogue box and to evade detection by Mcafee. When we ran our tests on a machine running Mcafee, the malware ran without a hitch. We should point out that our ability to evade Mcafee isn’t any indication of quality and that we can evade any Antivirus solution using similar custom attack methodologies. After all, its impossible to detect something if you don’t know what it is that you are looking for (It also helps to have a team of researchers at our disposal).
Once we had our malware built we loaded it onto the flash drive that we soldered into our mouse. Then we wrote some code for the teensy microcontroller to launch the malware 60 seconds after the start of user activity. Much of the code was taken from Adrian Crenshaw’s website who deserves credit for giving us this idea in the first place. After a little bit of debugging, our evil mouse named prion was working flawlessly.
Usage: Plug mouse into computer, get pwned.
The last and final step here was to ship the mouse to our customer. One of the most important aspects of this was to repack the mouse in its original package so that it appeared unopened. Then we used Jigsaw to purchase a list of our client’s employees. We did a bit of reconnaissance on each employee and found a target that looked ideal. We packaged the mouse and made it look like a promotional gadget, added fake marketing flyers, etc. then shipped the mouse. Sure enough, three days later the mouse called home.